Sale Request - Cash
Let's look at a very simple cash sale request to illustrate the importance of the Sale Request object and the Sale Manager component.
The User Interface
The starting point for your app functionality is the user interface. A typical user interface for accepting app payments is shown below, where a single Item 1 is being purchased at a price of 10.00 € and the tax rate is 20.00%. In this chapter, we look at how to handle a cash sale so the user's hand is shown clicking on the Cash button.

Tip
For our non-European readers, the € symbol indicates euros, which is abbreviated as EUR.
Of course, you need to create your own UI, but after that the SDK takes over. Let's see how the code is set up to handle this sale.
The iOS Design
The Sales Manager component is implemented somewhat differently on iOS and Android so we look at each individually, starting with the iOS object model and process flow.
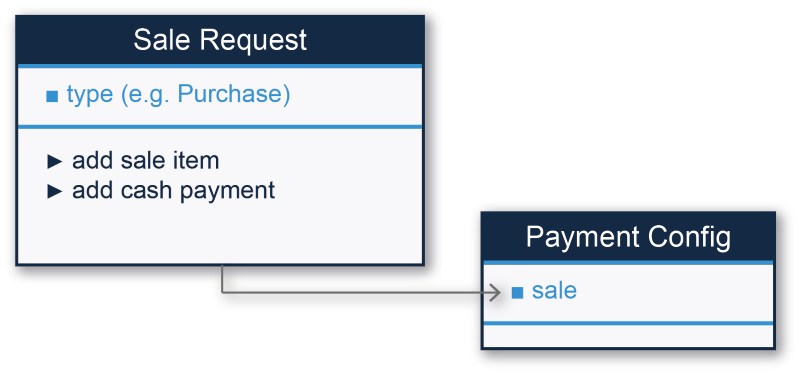
The iOS Object Model
The diagram below shows the key objects involved in the processing of a cash sale request.
Note
The object and method names above are shown in simplified pseudo-code to make it easier to read for both developers and non-developers. Generally speaking, we remove the WDePos, which is the prefix at the beginning of all class names, and we add in some spaces. For example, the actual class name is WDSaleRequest but that is tough to read, so we display it as Sale Request instead. We do the same with method names. For example, the method add cash payment, shown above, is implemented in Objective-C and Swift as addCashPayment.
Info
When adding a payment method (addCashPayment, addCardPayment, etc.), you can optionally include a notification callback URL in your payment request (notifyUrl). This URL will then be called once the payment is completed, if you chose to set it.
The iOS Process Flow
The process flow in the code is as follows:
- Instantiate a Sale Request object.
- The type attribute of Sale Request defines the type of sale request, most commonly a Purchase.
- Add details to the Sale Request object with the add sale item method.
- For cash transactions, use the add cash payment method.
- Pass the full details of the Sale Request to the Payment Config object in the sale property.
At this point, the Sales Manager component has everything it needs to process the payment in the sale property, and the next steps are described in The Payment Flow chapter.
The Android Design
The Android design and process flow is described below.
The Android Object Model
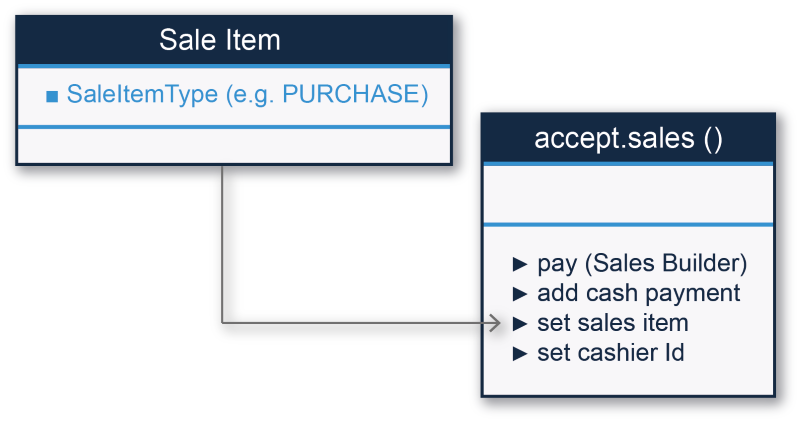
The Sales Manager component in Android is implemented as the sales() method of the EposSDK class. The Sales Builder then does most of the work as shown:
The Android Process Flow
The process flow is:
- Create an items object with a Sale Item Type of Purchase.
- Use Sale Builder to create the sale request.
- Add the sample amount (i.e., 10 €), currency and tax inclusion for the sample sale item with pay(Sales Builder).
- The add cash payment method indicates that the full amount of the sale is paid with cash (i.e., 10 €).
- A saleId string is returned which has the complete sale object.
At this point, the Sales Manager component has everything it needs to process the payment in the sale property, and the next steps are described in The Payment Flow chapter.
The Sample Code
Before jumping ahead, you should look at the sample code that demonstrates exactly how this is implemented, using the example of a single item shown in the picture of the UI.